Building an API Gateway with NGINX

Building an API Gateway with NGINX
Author: Shane Larson
NGINX is a versatile web server that can be effectively used to create an API Gateway, providing a single entry point for client applications to communicate with distributed microservices. This approach simplifies API management and improves scalability. Let's explore how to set up an API Gateway using NGINX.
Installing NGINX
First, install NGINX on your Ubuntu Linux system:
sudo apt-get update
sudo apt-get install nginx
After installation, you should be able to access the web server at http://<ip address>:<port> or https://<ip address>:<port>.
Configuring the API Gateway
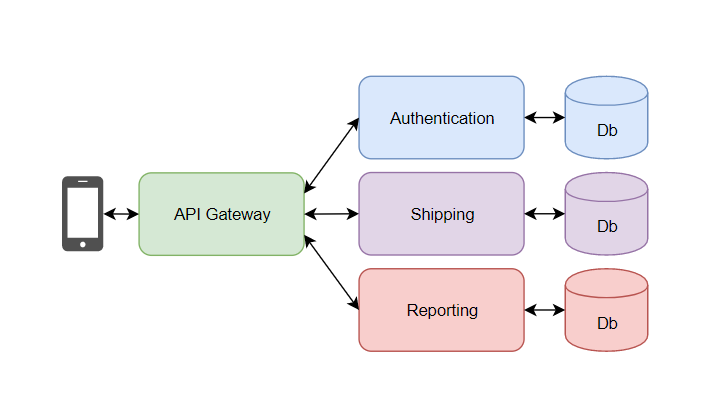
Let's configure the gateway to connect to three microservices: Authentication, Shipping, and Reports. Edit the NGINX default configuration file:
sudo nano /etc/nginx/sites-available/default
Replace the existing content with this configuration:
upstream authentication {
  server 162.243.144.211:8080;
}
upstream shipping {
  server 162.243.144.211:8081;
}
upstream reporting {
  server 162.243.144.211:8082;
}

server {
  listen 443;
  location /auth/ {
    proxy_pass https://authentication/;
  }
  location /shipping/ {
    proxy_pass https://shipping/;
  }
  location /reporting/ {
    proxy_pass https://reporting/;
  }
}
This configuration sets up three upstream directives and configures the server to forward requests to the appropriate service based on the URL path .
Applying the Configuration
Reload NGINX to apply the new configuration:
sudo service nginx reload
You can now test the API gateway by accessing the following routes:
- Authentication:
https://162.243.144.211/auth - Shipping:
https://162.243.144.211/shipping - Reporting:
https://162.243.144.211/reporting
Adding Load Balancing
To scale your services, you can easily add load balancing. For example, to load balance the authentication service, update its upstream directive:
upstream authentication {
  server 162.243.144.211:8080;
  server 162.243.144.211:8082;
}
Reload NGINX to apply the changes:
sudo service nginx reload
By setting up NGINX as an API Gateway, you create a flexible and scalable architecture for your microservices. This approach allows you to easily manage and route requests to your backend services, providing a unified interface for your API clients .